


Todays Christmas tutorial is my class I did for the Christmas workshop, over at Bad Girls.
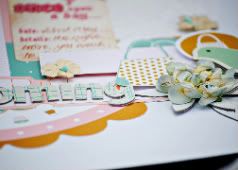
I love these paper trees, they are so versatile.
Lets grab our supplies!
• A selection of pattern papers
• Embellishments – I used blooms and brads
• Embellishments – I used blooms and brads
• Ribbon
• Tin container
• Tin container
• Circle punch or diecut 3” – 4”
• Glue stick
• Glue stick
• Scoring tool
• Wooden dowelling or stick
• Floral foam and moss
• Glue gun
To assemble :


• First punch out 20 circles in various papers. Punch a hole in one of the circles for your wooden stick to go through.
• Score a triangle on all 20 circles and fold upwards


• With your glue stick , glue 5 circles together for the top and five circle for the bottom


• Next glue the remaining 10 circles to form a band.
• Glue top and bottom to the middle band

• Cut your dowelling to required size, remember your paper ball sits on top, • Now wrap your dowelling with ribbon, or paint. I left mine as is.

• Add the floral foam to your pot. Stick the doweling into the centre of the moss and using a glue gun secure in place.
• Add the moss to the top of your pot. I placed 2 flowers layered onto the top of the moss and made a hole in the centre for the doweling to go through.
• Now you can secure the paper ball to your dowelling using a glue gun.
• Now you can secure the paper ball to your dowelling using a glue gun.
• Finally tie ribbons around the bottom of the paper ball. I decorated my paper ball with some small brads in the centre of each section.
• Enjoy!
Change the size of your punch for a different size tree. I have made a mini tree using a 1” punch, and Fancy Pants Christmas papers which I will photograph and pop on my blog! Here is a tree I made for our Easter table this year.

Do share your creations with me, by posting a link in the comments section.
So, have you noticed any changes round here? I now have a RSS feed, and you can subscribe by email for updates. Details on the lhs bar. Hopefully it is a bit tidier now and easier to navigate. Still have a few more bits to add, but we are nearly there!
Tomorrow is Five Fav Friday, and I will be sharing my favourite Christmas projects form a round the web
Tomorrow is Five Fav Friday, and I will be sharing my favourite Christmas projects form a round the web
See you tomorrow
Hugs and thanks as always for stopping by
Anna x


That is a great Idea, I am going to do that for my Daughter's playroom, I wanted cute little topiaries to sit on top of her shelves these will be super adorable!!!
Something else to add on on to my 'to do' list!
I love these too and also made some in the Spring time which I used again for Evies birthday with a matching birthday banner! Like the new look blog hun xx
Oh, this tree is SO cute!! thanks for the tutorial!!
This ine is really cute!! Thanks for sharing!!