Photobucket'>http://s75.photobucket.com/albums/i320/poshtotty_2006/blog/?action=view&current=smallad.jpg" target="_blank">Photobucket'>http://i75.photobucket.com/albums/i320/poshtotty_2006/blog/smallad.jpg" border="0" alt="Photobucket">

About Me

Married to my soulmate with 2 beautiful girls,and our English Springer Spaniel, Suki. Living a country life in Cambridgeshire, whilst baking, gardening, and photographing our daily lifes, where they find a place on my scrapbook pages.

http://i75.photobucket.com/albums/i320/poshtotty_2006/DSC_0103-1.jpg

My little place on the web

This blog is just that, my little place on the web.You will find my daily (or not so daily, hehe)life, my love for my new vegetable garden, baking, photography and my scrapbooking!

http://i75.photobucket.com/albums/i320/poshtotty_2006/DSC_0094.jpg?t=1280148371

My Scrapbooking

Scrapbooking is a way of life for me now.It has been for over 4 years. I love journaling, taking photos of my family and love colour and texture, these are all part of my everyday life and scrapbooking.

http://i75.photobucket.com/albums/i320/poshtotty_2006/DSC_0025.jpg?t=1280148242

Doily Tutorial

blogged by me domestic goddess On 5/27/2011 08:25:00 PM
So here is how I make a paper doily, maybe not the "right" way, but its the way that works for me, LOL

You will need:

1 sheet of 12" x 12" paper ( I used Nikki Sivils Its Your day)
Circle cutter or something round to trace round
Decorative edge punch
Trimmer
Glue

  • Firstly choose your sheet of 12" x 12" paper

  • Cut a circle the size you want. I cut a 2.5" diameter 
  • Now punch out about 3 - 4 decorative edge strips


  • Lightly scrunch the strips, and if you want you can lightly spritz with water to make the strips more pliable

  • Ink the edges if you wish of your circle and strips
  • Now start pleating the strips and adhere with glue onto the wrong side of your circle


  • Keep going until you have completed your circle.

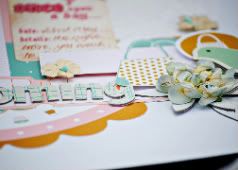
  • Turn over and admire your doily work!
  • Add to your layout


Easy isn't it!

Thanks for stopping by and do share your doily projects by posting a link in the comments below.
Anna x

5 Response to 'Doily Tutorial'

  1. Sarah Said,
    http://scrappingtonight.blogspot.com/2011/05/doily-tutorial.html?showComment=1306525287747#c771296687262384186'> 8:41 PM

    What a brill idea will have to try it


  2. furrypig Said,
    http://scrappingtonight.blogspot.com/2011/05/doily-tutorial.html?showComment=1306525388311#c1090448211253765481'> 8:43 PM

    that sounds simple even I might be able to do it thanks xxx


  3. Kathy Martin Said,
    http://scrappingtonight.blogspot.com/2011/05/doily-tutorial.html?showComment=1306528516966#c5846971781719838252'> 9:35 PM

    Awesome technique! Thanks! :)


  4. http://scrappingtonight.blogspot.com/2011/05/doily-tutorial.html?showComment=1306546378952#c2243921372573986905'> 2:32 AM

    Love this idea with my favorite papers.


  5. http://scrappingtonight.blogspot.com/2011/05/doily-tutorial.html?showComment=1306567164366#c3598349895347540942'> 8:19 AM

    fabulous TFS