Photobucket'>http://s75.photobucket.com/albums/i320/poshtotty_2006/blog/?action=view&current=smallad.jpg" target="_blank">Photobucket'>http://i75.photobucket.com/albums/i320/poshtotty_2006/blog/smallad.jpg" border="0" alt="Photobucket">

About Me

Married to my soulmate with 2 beautiful girls,and our English Springer Spaniel, Suki. Living a country life in Cambridgeshire, whilst baking, gardening, and photographing our daily lifes, where they find a place on my scrapbook pages.

http://i75.photobucket.com/albums/i320/poshtotty_2006/DSC_0103-1.jpg

My little place on the web

This blog is just that, my little place on the web.You will find my daily (or not so daily, hehe)life, my love for my new vegetable garden, baking, photography and my scrapbooking!

http://i75.photobucket.com/albums/i320/poshtotty_2006/DSC_0094.jpg?t=1280148371

My Scrapbooking

Scrapbooking is a way of life for me now.It has been for over 4 years. I love journaling, taking photos of my family and love colour and texture, these are all part of my everyday life and scrapbooking.

http://i75.photobucket.com/albums/i320/poshtotty_2006/DSC_0025.jpg?t=1280148242

Felt Decorations

blogged by me domestic goddess On 12/13/2008 04:45:00 PM 6 lovely comments
Firstly, thank you for all your lovely comments. We are just waiting. The news an hour ago was Uncle was deteriorating, Peter wants me to stay at home tonight and not make the visit. He is not responding and Peter says I will be too upset, I am best having good memories of how he looked, so hard isn't it.

Beware this will be a long post, I have lost to catch up on!
What should have been posted yesterday, was a quick tutorial for some felt Christmas tree decorations. These are so easy to make. Izzy even joined me in the fun!

So lets grab our supplies...


Felt in various colours
Co ordinating embroidery thread
buttons
sequins
ribbon
stuffing!
cookie cutters in Christmas shapes
paper
pencil
needle


Lets start making...


  • First trace your cookie shape into paper and add about 1/2" around the edge
  • Now using your paper pattern to cut out 2 felt shapes per decoration


  • I used a simple over stitch to sew my 2 pieces together. Before you sew the pieces together completely you need to stuff your shape and add your ribbon so that you can hang onto your tree


  • Now start to decorate your shape with buttons, sequins and ribbon.
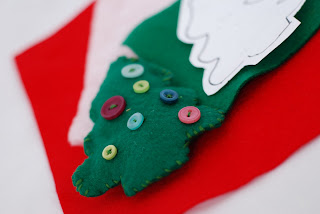


  • Once you are finished go hang your decoration on your tree and sit back and enjoy!


And the black one is Izzys!

I saw a felt tree that had a piece of doweling sewn into the bottom and then this was put into a small pot. They did look awfully sweet! See my topiary tree instructions , but why not add a felt tree to your pot.

Thursday say the girls Nativity play. My favourite school production of the year, and one that leaves slightly teary eyed, this years was no exception. Izzy was Mary for her years production, and Lilly was in the band.


Yesterday we managed to decorate the house for Christmas. This did take our minds of the awful news we were having to deal with. The girls helped loads this year. Izzy did my Angel display and also the Santa display on the telephone table. Both the girls helped decorate the tree. And as is tradition, we listened to Nat and Dean crooning to us whilst we decorated.


Love this photo, although poor quality, due to a high ISO, you can see the girls decorating the tree!


caught on camera, Lilly kissing her reflection!


Today, I have been finishing of Christmas Cards, whilst the girls went shopping with Peter for what I do believe is my birthday pressies. Peter also came home with a new Reindeer for me, and she is so beautiful. i will take a photo tomorrow and share. Last year he bought me a leather Reindeer, which I actually have out all year
This afternoon we watched a favourite Christmas movie, The Muppet's Christmas Carol, which now moves me onto my Five Fav Friday Christmas Movies.

1. Its a Wonderful Life - has to be watched every Christmas Eve, and a bucket full of tears will be shed once again!
2. The Muppet's Christmas Carol - a classic!
3. Polar Express - if you need convincing that Santa still exists, this is the movie, I so love the Santa scene
4. Holiday - thanks to Sue who introduced me to this movie, a girlie classic
5. A Nightmare before Christmas - amazing animation
so thats it for me today, its my birthday tomorrow and I am off to a Princess party and watch a good friend of ours play in his Brass Band, Disney classics!!

Before I go you must check out Graphic 45's blog, as Bad Girls are the featured artisit this weekend, and I am first up *grins*

Until tomorrow
Hugs, especially to those that need it

Anna xx
RIP Uncle Norman, a very loved man who will be sorely missed xxxx

| | edit post

Christmas Tree Decoration

blogged by me domestic goddess On 12/12/2008 09:15:00 PM 12 lovely comments
Sorry, this post should have gone up yesterday. Unfortunately we had some very bad news with regard to a close relative, and this has just put a dampener on the festive season. I have had to stop typing as Peter has just been on the phone and tears are rolling down my cheeks. Life is truly tough at times, and 2008 and has been a horrid year for so many reasons, and nearly all of them have been health related. I am so lucky , truly lucky, to be sitting here, knowing that my tumour is benign. Next week I will have my operation, and the last 2 months will be only a memory. But this family I have married into, have had to live with very advanced cancer twice this year, in their nearest and dearests. How does a son, a daughter cope with their mum and dad dying of cancer within 6 months of each other, I have no idea. I just couldn't cope.

I am not in a very festive mood today. We did put our decorations up tonight, mainly for the girls and to cheer ourselves up. I am going to sign off and wait for Peter to come home, and hold him tight.
I will be back on track tomorrow.
Please go hold your loved ones close tonight.
Hugs
Anna x

| | edit post

The Christmas Card

blogged by me domestic goddess On 12/10/2008 02:21:00 PM 7 lovely comments
Todays Christmas craft, is the Christmas photo card. At this years Christmas workshop, Annie taught a really cute mini book. When I saw how the book was made, I took one element and made this Christmas card! I used last years Scenic Route Christmas papers, which I love, with the matching stickers.


You can download the step by step here.


Yesterday i went shopping for a few Christmas baking essentials for the start of my baking ritual for next week;


dried cranberries - for cookies (recipe in yesterdays post) and breakfast muffins
fresh cranberries - homemade cranberry sauce
chocolate chunks - white and plain for cookies and snow speckled brownies
chestnuts - to add to my Brussel Sprouts , pancetta and brandy dish!!
sweet mincemeat - star topped mince pies


This week I need to order the Turkey crown and ham. Next week i will start baking for the freezer. Mainly because i have my operation next Thursday and I need to be slightly ahead of some of the Christmas traditions. I will share with you my favourite recipes, from Christmas brownies, to Christmas morning muffins, which are so delicious!


I am currently waiting for my photo box order of Christmas photos so i can complete my cards (today's step by step). I will also be making some petite fours to box up and send with presents that need to be posted next week.


Its a busy festive week here. the girls have their Christmas Nativity at the moment, and we are off to watch them tomorrow night. Tomorrow I have my pre op assessment and then off to the garden center to get my fix of twinkly flashy lights and singing Santa's!, and then Friday night we are decorating the house and tree for Christmas!


The rest of the week on my blog look like this:


Thursday - Christmas Tree Decorations
Friday - Five Fav Friday Christmas Movies
Saturday - My December Journal so far
Sunday - Its my birthday!!!! and a birthday RAK will be up for grabs.


I have some Cosmo Cricket "Be Good" Christmas kits over at Scrapping Angels to buy at only £5.00!! Limited Stock

Thanks as always for stopping by


Hugs

Anna x

| | edit post

Cookie Monster...

blogged by me domestic goddess On 12/08/2008 09:34:00 PM 8 lovely comments
Today's step by step, is a cookie bag. I first saw this bag over at Bad Girls at the Christmas Workshop by Malin. I have adapted the bag sizes and such, a little to suit me better.

Grab your supplies!


I used Basic Grey papers, 1 sheet makes 2 bags, (I suggest a double sided card stock weight paper)
Co ordinating scraps to decorate
Ribbon
Embellishments
Cookies ( see recipe below)
Cookie bags
bone folder
hole punch
ink (optional)
Scalloped punch 3"
Scalloped punch 2"

Time to make your bags

- Trim your 12" x 12" sheet into 6" x 12"
- Now score 1 3/4" in from each side
- Next score 5" up from the bottom and from the top
- Score 2" down and 1 3/4" in, on all 4 sides
- Cut along the line to the 5" score line, and cut the 2" x 1 3/4" out.


this is what your bag should look like now

- Ink if you want all edges at this stage


- Using double sided tape, adhere 2 of the flaps and stick to form a box


- Now lift up the 2 sides, you now have your basic cookie bag. I now made a flap to pop over the top of my bad, using a scalloped punch. I stuck the scalloped circle onto one side of the bag, and punch a hole and thread ribbon through to keep the bag closed.
- Decorate your bag as you wish :)


Now for the cookies; perfect for Christmas. Unfortunately I have no photo of my cookies, as somebody ate all the leftovers before i had a chance to photograph the next morning!!!


INGREDIENTS
100gm butter
40gm sugar
1/4 tsp vanilla essence
100ml Amaretto
1 egg yolk
140 gm flour
1/2 tsp baking powder
125gm ground almonds
150gm white chocolate buttons, chopped into slivers
1 cup dried cranberries
50gm icing sugar
METHOD
1. Cream butter and sugar, add vanilla, Amaretto and egg then mix until combined.
2.Add flour, baking powder and almonds, then mix lightly until combined.
3. Stir the white chocolate and cranberries into the mix by hand until evenly distributed.
4. Roll tablespoonfuls into balls and bake on greased trays ( they will spread so leave enough room) at 150ÂșC for about 15 mins or until cooked and lightly browned.
5.Cool on wire racks until they are cool enough to handle and roll in the sifted icing sugar.
6.Leave to cool completely on rack. ENJOY!!!


I made these cute bags filled with cookies for my crop girls on Sunday. I will be making more for teachers gifts.
Did you notice my new festive banner? Well keep an eye out as the "outtake" banner will be making an appearance this week!! Well worth the wait!

This weekend saw Bad Girls December kit reveal. Lots of luscious vintage papers from Graphic 45, Mellisa Francis trinkets and gorgeous Prima blooms. Here are my DT layouts for December. Do check out the DT gallery, it will seriously blow you away!


Also Pencil Lines sketch 114 went live last night, with Sandie Vincent's our guest designer

I used MME papers, crochet embellies from old clothes of Lilly's!


I cannot believe there is only a few more weeks left of Christmas. I still have so much yet to pack into the last few weeks. Thankfully I am meeting my PA and personal shopper, Sue on Monday, and I know she will have me all sorted!!
I will be back tomorrow with a quick and easy Christmas photo card to share with you

Thanks as always for stopping by
Hugs

Anna xx

| | edit post

Five Fav Friday

blogged by me domestic goddess On 12/05/2008 01:26:00 PM 10 lovely comments
Its Friday, and to continue my Christmas Projects theme, I have scoured the Internet for some of my favourite online Christmas crafts and tutorials.


1. Loving this quick and easy project from Tracie. I will definitly be making some of these to give away this Christmas.(imaged pinched form tracies blog)


2. The shimmering newspaper trees are just adorable, love them!


3.Loving what Pink Paislee are doing on their blog. Lots of gorgeous projects for Christmas

4. Michelle Filo has made some gorgeous hybrid calender templates. Perfect for those last minute gifts you need to make. This is a FREE download

5. Finally Tim Holtz is doing his 12 tags of Christmas, stunning as always!


......and don't forget Ali Edwards is doing a Christmas Journal, December Daily which is free, and she always has a ton of inspiration on her blog. This is my Christmas Journal so far. I am using my Chocolate Advent calender windows on my pages, all relevant to 2008 :)

How are your Christmas Journals getting on?


I have my Christmas Crop on Sunday and I am busy making little gifts for everyone, which is also tomorrows Christmas Project!

Finally, here is a sneek of my Pencil Lines layout for this weekend.


Hugs and Thanks for stopping by

Anna x

| | edit post

Paper Topairy Tree

blogged by me domestic goddess On 12/04/2008 04:51:00 PM 5 lovely comments


Todays Christmas tutorial is my class I did for the Christmas workshop, over at Bad Girls.

I love these paper trees, they are so versatile.


Lets grab our supplies!

• A selection of pattern papers
• Embellishments – I used blooms and brads
• Ribbon
• Tin container
• Circle punch or diecut 3” – 4”
• Glue stick
• Scoring tool
• Wooden dowelling or stick
• Floral foam and moss
• Glue gun


To assemble :


• First punch out 20 circles in various papers. Punch a hole in one of the circles for your wooden stick to go through.
• Score a triangle on all 20 circles and fold upwards


• With your glue stick , glue 5 circles together for the top and five circle for the bottom


• Next glue the remaining 10 circles to form a band.
• Glue top and bottom to the middle band


• Cut your dowelling to required size, remember your paper ball sits on top, • Now wrap your dowelling with ribbon, or paint. I left mine as is.


• Add the floral foam to your pot. Stick the doweling into the centre of the moss and using a glue gun secure in place.
• Add the moss to the top of your pot. I placed 2 flowers layered onto the top of the moss and made a hole in the centre for the doweling to go through.
• Now you can secure the paper ball to your dowelling using a glue gun.
• Finally tie ribbons around the bottom of the paper ball. I decorated my paper ball with some small brads in the centre of each section.
• Enjoy!

Change the size of your punch for a different size tree. I have made a mini tree using a 1” punch, and Fancy Pants Christmas papers which I will photograph and pop on my blog! Here is a tree I made for our Easter table this year.


Do share your creations with me, by posting a link in the comments section.


So, have you noticed any changes round here? I now have a RSS feed, and you can subscribe by email for updates. Details on the lhs bar. Hopefully it is a bit tidier now and easier to navigate. Still have a few more bits to add, but we are nearly there!
Tomorrow is Five Fav Friday, and I will be sharing my favourite Christmas projects form a round the web

See you tomorrow

Hugs and thanks as always for stopping by

Anna x

| | edit post

Its starting too look

blogged by me domestic goddess On 12/03/2008 10:10:00 PM 4 lovely comments
a lot like Christmas here. Advent calenders are being opened daily, the studio Christmas tree was put up today, and Christmas crafts are scattered across my work desk! Parcels of goodies have arrived, including this one from Sue. A remedy box to help me on the mend, contents as follows:


Vitamin C
2 mini ripples
1 galaxy hot chocolate sachet
1 pack of pink paper Christmas decorations for studio Christmas tree!
1 very pretty postcard full of cupcakes!
You are the best hun, thank you, xoxoxoxo


The wreath instructions I posted yesterday using the scallop punch, the sizes of punch I used are 3", 2" and 1". If you do not have a scallop, use an ordinary circle punch :)

Monday, I finally started and completed a mini book I have wanted to do for ages. I have a few acrylic albums, and I finally decorated one, using Lilly's 5th birthday party photos. Really enjoyed making this.
I used Basic Grey papers, Basic grey rubons, Prima bling, Heidi Swapp felt butterflies, Scenic Route rubons, Autumn Leaves circle girly stamps. Again my trusty scallop punch came out!


Yesterday the church crib arrived at ours. The girls had fun putting all the figures out. Tomorrow it moves on to the next house, and the next, until the 21st, where it is returned at the church for Christingle.


Today I have been making cookie bags. They are dead easy and take 10 minutes to make! Step by step at the weekend on my blog :)
Tomorrows tutorial will be a paper topiary tree. I love making these little trees, perfect center piece for your dining table at any time of the year.


I am off to see the DR tomorrow as my voice is non existent, and I have my operation date for the 18th of this month! My pre op assessment is next Thursday so i need to be fit and healthy by then! Lots of healing vibes needed.
Hugs, and see you tomorrow for my next Christmas project tutorial.
Anna x

| | edit post